[Coroutine Basics 6] Structured Concurrency, CoroutineScope, CoroutineContext
1. Structured Concorrency
Coroutine은 비동기 작업을 효과적으로 다루기 위해 사용되는데, 이를 구조화된(concurrent) 방식으로 관리하는 것이 중요하다.
이전 포스트에서 Coroutine Job의 Life Cycle에 대해 살펴보았다.
Life Cycle 값들을 살펴보면 Completed 전에 Completing 상태를 거치는것을 확인할 수 있다.
Completing 상태에서 해당 코루틴은 자식 코루틴의 상태를 처리한다.
자식 코루틴이 모두 완료될 때까지 기다리거나, 자식 코루틴에서 예외가 발생한 경우 다른 자식들에게 취소 요청을 보내는 등의 작업을 한다.
                                          wait children
    +-----+ start  +--------+ complete   +-------------+  finish  +-----------+
    | New | -----> | Active | ---------> | Completing  | -------> | Completed |
    +-----+        +--------+            +-------------+          +-----------+
                     |  cancel / fail       |
                     |     +----------------+
                     |     |
                     V     V
                 +------------+                           finish  +-----------+
                 | Cancelling | --------------------------------> | Cancelled |
                 +------------+                                   +-----------+
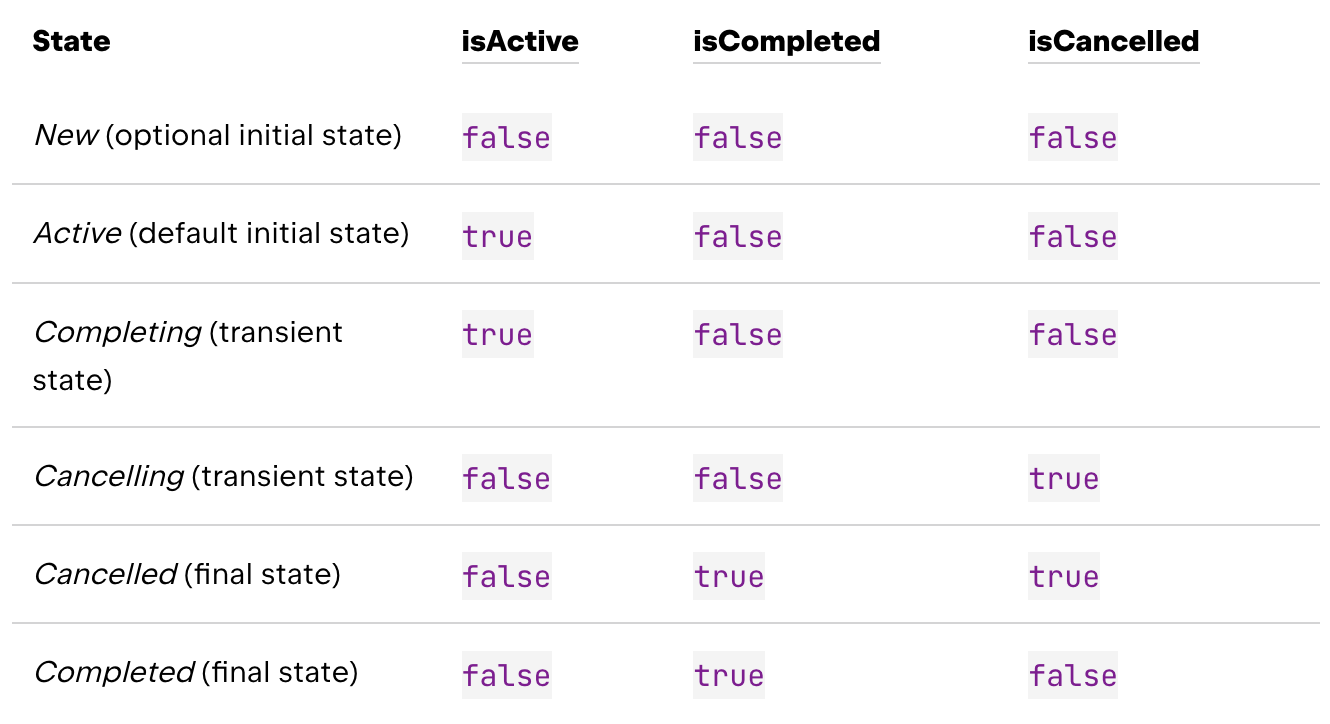
실제로 부모 코루틴에 A와 B라는 자식 코루틴이 있는 상황에서, B의 작업에서 Exception이 발생했고, A가 실행 중이라면 A 또한 취소 요청을 받게 된다.
실제로 코틀린 공식문서에 이런 말이 적혀있다.
The coroutine scope is responsible for the structure and parent-child relationships between different coroutines. New coroutines usually need to be started inside a scope.
이렇게 부모-자식 코루틴이 한 몸처럼 움직이는 관계를 'Structured Concurrency'라고 한다.
(코루틴 공식문서를 보면 이러한 부모자식 구조가 GlobalScope로 시작하는 구조와 대조되는 개념인듯 하다)
이러한 Structured Concurrency는 CoroutineScope와 CoroutineContext에 의해 작동한다.
2. Coroutine Scope
이전 코루틴 예시들을 보면 launch와 async라는 코루틴 빌더를 활용해 왔다. 사실 launch와 async은 CoroutineScope의 확장함수이다.
// Builders.common.kt 파일 내부

public fun CoroutineScope.launch(
    context: CoroutineContext = EmptyCoroutineContext,
    start: CoroutineStart = CoroutineStart.DEFAULT,
    block: suspend CoroutineScope.() -> Unit
): Job {
    val newContext = newCoroutineContext(context)
    val coroutine = if (start.isLazy)
        LazyStandaloneCoroutine(newContext, block) else
        StandaloneCoroutine(newContext, active = true)
    coroutine.start(start, coroutine, block)
    return coroutine
}

public fun <T> CoroutineScope.async(
    context: CoroutineContext = EmptyCoroutineContext,
    start: CoroutineStart = CoroutineStart.DEFAULT,
    block: suspend CoroutineScope.() -> T
): Deferred<T> {
    val newContext = newCoroutineContext(context)
    val coroutine = if (start.isLazy)
        LazyDeferredCoroutine(newContext, block) else
        DeferredCoroutine<T>(newContext, active = true)
    coroutine.start(start, coroutine, block)
    return coroutine
}
CoroutineScope을 만드는 방식은 아래 두 가지가 될 수 있겠다.
main 함수 안에서 CoroutineScope를 직접적으로 시작하는 것, 그리고 runBlocking의 블록을 채우는 것이다.
runBlocking과 CoroutineScope은 어떤 연관이 있길래 CoroutineScope의 확장함수인 async와 launch를 활용할 수 있는 걸까? 아래 코드에서 runBlocking 내부 코드 중 마지막 파라미터에 block의 경우 실제로 CoroutineScope 확장 함수로서 실행된다. 이로써 우리는 CoroutineScope을 명시적으로 기재하지 않고도 그 확장 함수들을 활용할 수 있었던 것이다.
// 1. CoroutineScope 직접 열기
suspend fun example() {
val job = CoroutineScope(Dispatchers.Default).launch {
printWithThread("A")
}
job.join()
}
// 2. runBlocking 활용하기
fun main(): Unit = runBlocking {
launch {
delay(600L)
printWithThread("A")
}
}
// runBlocking내부 코드
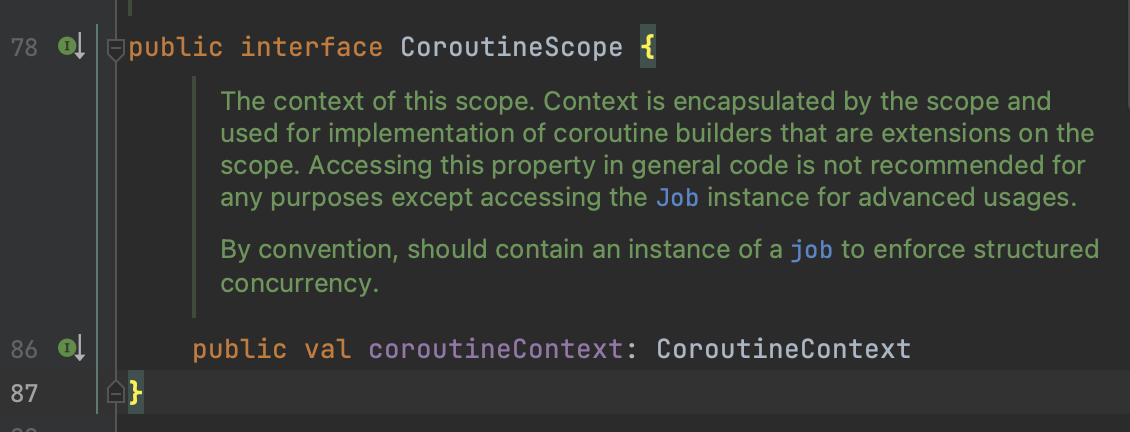
public actual fun <T> runBlocking(context: CoroutineContext, block: suspend CoroutineScope.() -> T): T { ... }실제로 CoroutineScope의 내부 구조는 아주 간단하다. 바로 coroutineContext를 담고 있는 구조이다.
3. CoroutineContext
CoroutineContext는 코루틴과 관련된 여러 가지 데이터를 담고 있다.
CoroutineContext 내부 구조는 Map과 Set을 섞어둔 자료구조를 사용된다고 한다. Map처럼 key-value 형태로 이루어지며, set처럼 동일한 key를 가진 데이터가 중복되지 않으며 unique 하다.
CoroutineContext에 정보가 추가, 제거되는 방식은 연산자 오버로딩을 활용하는 것 같다.
따라서 + 기호를 써서 CoroutineContext에 코루틴 이름이나, Dispatcher, 부모 코루틴의 정보가 들어간다.
이러한 정보를 통해서 한 영역에 있는 코루틴들은 영역 자체를 cancel() 시킴으로써 모든 코루틴을 종료시킬 수도 있다.
// + 기호를 이용한 Element 합성
CoroutineName("나만의 코루틴") + SupervisorJob()
// context에 element추가
coroutineContext + CoroutineName("나만의 코루틴")
// minusKey
coroutineContext.minusKey(CoroutineName.Key)
처음에 Element를 추가하고 빼는 게 무슨 말인지 몰랐는데, 풀어서 설명하자면 아래와 같다.
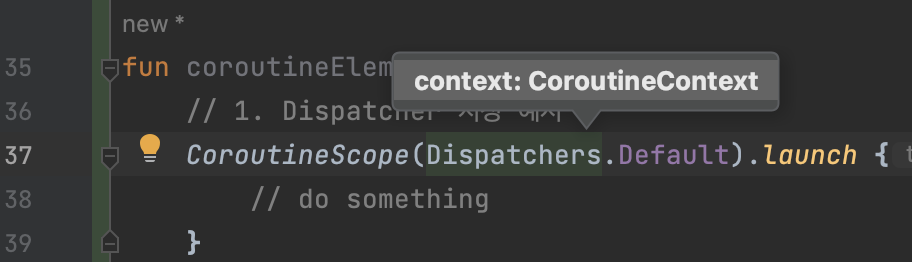
아래 코드 예시에서와 같이 우리는 CoroutineScope을 열 때 Dispatcher를 지정해주고 싶은 경우도 있고, exceptionHandler를 지정해주고 싶은 경우도 있다. 그러나 이 둘을 함께 적용하려면 어떻게 해야 할까?
fun coroutineElementExample(){
    // 1. Dispatcher 지정 예시
    CoroutineScope(Dispatchers.Default).launch {
        // do something
    }
    // 2. exceptionHandler 지정 예시
    val exceptionHandler = CoroutineExceptionHandler{ _ , _ -> /**/}
    CoroutineScope(exceptionHandler).launch {
        // do something
    }
}
CoroutineScope 함수의 파라미터를 보면 CoroutineContext 인자가 하나이다.
여기에 이제 + 연산자를 통해서 Dispatchers 정보랑 exceptionHandler를 CoroutineContext 하나로 묶어서 전달하게 되는 것이다.
CoroutineScope(Dispatchers.Default + exceptionHandler).launch {
   // CoroutineContext에 여러개 Element를 함께 넘겨준 예시
}